Since a mobile phone is relatively small in size and portable, we usually use it to take photos when we go on a vacation, get together with family or friends, and merely have a good meal. When thinking about recalling these precious memories, many of you may want to see pictures on iPhone, iPad Mini/iPad Air due to its larger screen. Not knowing how to transfer photos from Android to iPhone/iPad and worrying that the transmitted photos might be compressed must bother you a lot. Get your head out of the clouds, there are some ways to help you out and some of them are quite easy and convenient. Without further ado, I will recommend you two ways of solving the photo-sharing problems between the iPhone and the Android phone.
Method 1: Copy Photos from Android to iPhone/iPad Through Google Photos
Google Photos is a photo-sharing and storage service application, it provides free 16GB storage for photos. You can view or download all of your photos if you sign into the same Google account no matter on what device. One thing that you should bear in mind is that make sure Google Photos are supported by your Android devices. Let’s have a look at this method.
Detailed steps to transfer photos from Android to iOS via Google Photos
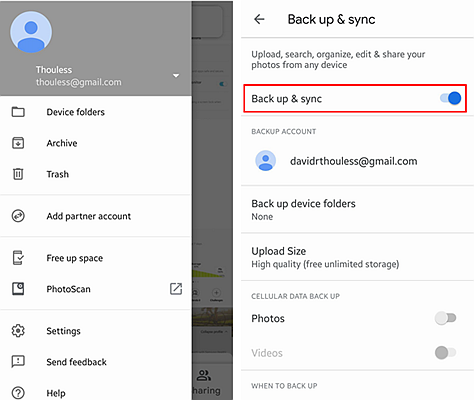
Step 1: Turn on your Android phone, and start Google Photos, click the Menu icon at the top left, choose Settings > Back up & Sync, turn on the option “Back up & Sync” and “Photos” on the next interface, then the photos on your Android phone will sync automatically.
Step 2: Turn on your iPad, open App Store, download and install the software – Google Photos, sign into the same Google account that you use on your Android phone, and then you can see all your photos.
Method 2: Manually Transfer Photos from Android to iPhone/iPad Through iTunes
Plug your iPad into Computer, and set it up well as below, next time when you connect your iPad to iTunes, it will scan and add the new photos from the designated folder automatically.
Steps to transfer photos from Android to iOS via iTunes
Step 1: Plug your Android Phone into a PC USB port and copy the files over to your PC.
Note: You can make a new folder on your Desktop and label it with a unique name, which will be beneficial to the following steps.
Step 2: Go to iTunes and plug your iPad into your computer. Click the phone icon and go to the phone manage screen, click the “photos” button on the left side.

Step 3: Check the option that says “Sync Photos from”, besides which you’ll find a drop-down menu, choose the folder that includes all photos from your Android phone.
Step 4: Click the button “Sync” in the bottom right corner and after that, you can see all your photos have been transferred to a new album on your iPad.

Method 3: Transfer Photos from Android to iPhone Through Mobile Transfer
Transferring photos from Android to iPhone/iPad is just a piece of cake with the help of this powerful tool – MobePas Mobile Transfer. The process is much more convenient and easier than the two methods mentioned above. Once you finish downloading the program and connecting your two devices to the PC, all you need to do is just a few clicks of the mouse. So let’s read further.
Step 1: Open the program Phone Transfer on your computer, click “Phone Transfer”.

Step 2: Connect both your Android phone and iPhone to the PC.
MobePas Mobile Transfer can detect devices connected to the computer automatically. Pay attention to the positions of the source device and destination device and don’t hesitate to click “Flip” if the sequence reverses. You are supposed not to tick the option “Clear data before copy” at the bottom of the destination device’s box to avoid the accident that the data on your Android is covered.
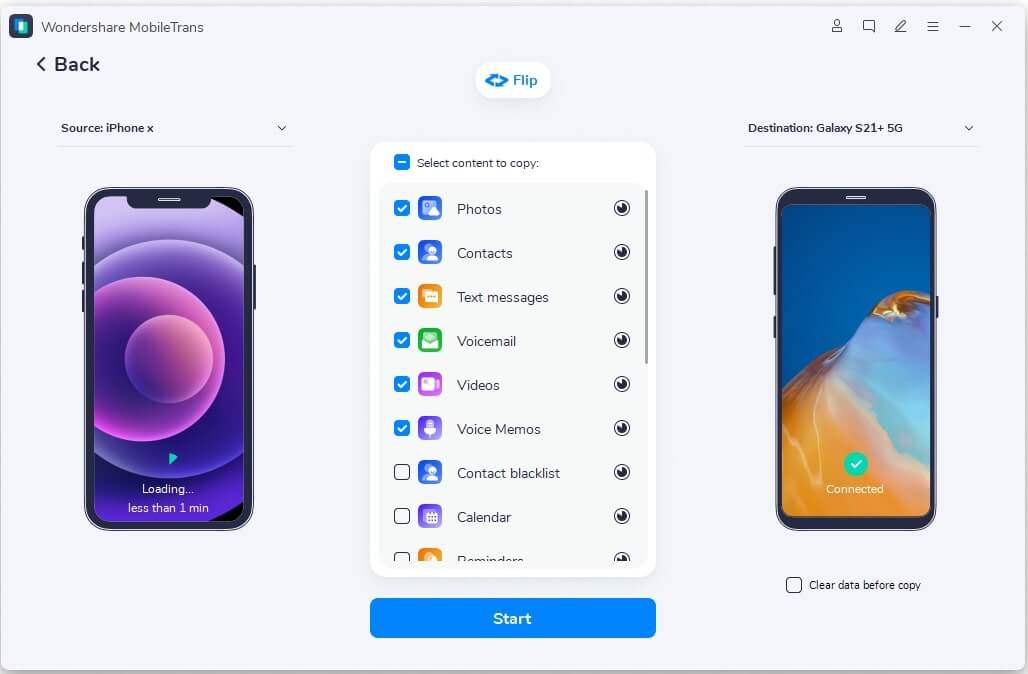
Step 3: Select “Photos” by ticking the small square box before it, and click the blue button “Start” to transfer photos.

Note: The time taken to finish the transfer process depends on the number of your wanted photos so keep patient here.
Conclusion
After having listed three solutions for transferring photos from Android to iPhone or iPad, I hope you can eventually solve your problem by using one of these methods. Synthesizing all kinds of factors, it’s fair to say that the best choice is MobePas Mobile Transfer, which offers you a comparatively larger space of computer local backup and makes it possible to backup and transfer different data types inclusive of contacts, messages, apps, videos and so on altogether by just one click. If you come up against any problem in the process of operation, leave it in the comment area, we will do whatever we can to help you.