
It’s a good habit to always keep things with a copy. Before editing a file or an image on Mac, many people press Command + D to duplicate the file and then make revisions to the copy. However, as the duplicated files mount up, it can disturb you because it makes your Mac short of storage or literally in a mess. So, this post aims to help you out of this trouble and guides you to find and remove duplicate files on Mac.
Why Do You Have Duplicate Files on Mac?
Before taking action to remove duplicate files, let’s go through some common situations in which you are likely to have accumulated numbers of duplicate files:
- You always make a copy before you edit a file or an image, but do not delete the original one even if you no longer need it.
- You move a patch of images into your Mac and view them with the Photos app. Actually, these photos have two copies: one is in the folder that they are moved into, and the other is in Photos Library.
- You usually preview the email attachments before downloading the files. However, once you open an attachment, the Mail app has automatically downloaded a copy of the file. So you get two copies of the attachment if you manually download the file.
- You download a photo or file twice without noticing it. There will be “(1)” in the file name of the duplicate.
- You have moved some files to a new location or an external drive but forgot to delete the original copies.
As you see, things often happen that you have got multiple duplicate files on your Mac. In order to get rid of them, you have to take some methods.
A Quick Way to Find and Remove Duplicate Files on Mac
If you already suffer from duplicate files on your Mac, you may want to solve the problem as quickly as possible. So in the first place, we would recommend you use a reliable duplicate file finder for Mac to finish this job, for example, Mac Duplicate File Finder. It can help you locate and remove duplicate photos, songs, documents, and other files on your Mac in simple clicks, and will immensely save you time. It’s totally safe and easy to use. Look at the following steps to get a grip on how to use it.
Step 1. Free Download Mac Duplicate File Finder
Step 2. Launch Mac Duplicate File Finder to Find Duplicate Files
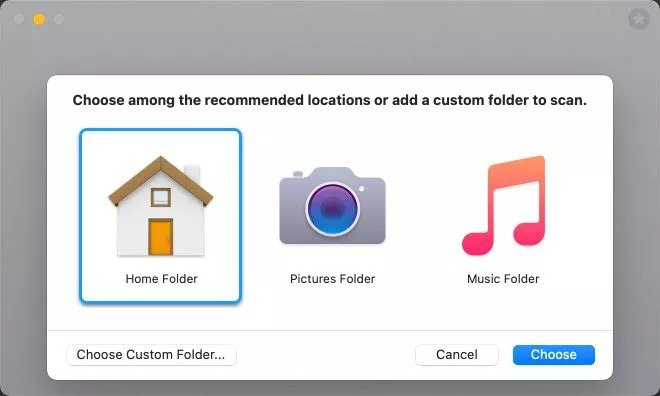
On the main interface, you can add the folder you want to scan for the duplicate files, or you can drop & drag the folder.

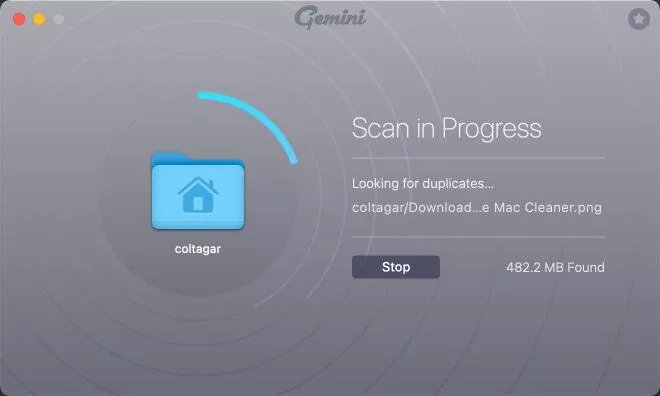
Step 3. Start Scanning Duplicate Files on Mac
After clicking the “Scan for Duplicates” button, Mac Duplicate File Finder will find all the duplicate files in a few minutes.
Step 4. Preview and Remove Duplicate Files
When the scanning process completes, all the duplicate files will be listed on the interface and are classified into categories.

Click the small triangle beside each duplicate file to preview the duplicate items. Choose the duplicate files you want to delete and hit Remove to delete them. A lot of space must be freed up!
Note: You can preview the photos, videos, songs, etc. beforehand to avoid mistaken deletion. Because duplicate files are mostly identified by names, double-checking before removing them is always recommended.
Find and Remove Duplicate Files on Mac with Smart Folder
Using the Mac built-in features to locate and remove duplicate files is also available, though it will cost a bit more time. One of the ways is to create smart folders to find out duplicate files and clear them up.
What’s Smart Folder?
The Smart Folder on Mac is not actually a folder but a search result on your Mac that can be saved. With this function, you can sort out the files on Mac by setting up filters like file type, name, last opened date, etc., so that you can easily access and manage the files you have found.
How to Find and Remove Duplicate Files with Smart Folder
Now that you know how the Smart Folder on Mac works, let’s create one to locate and remove duplicate files.
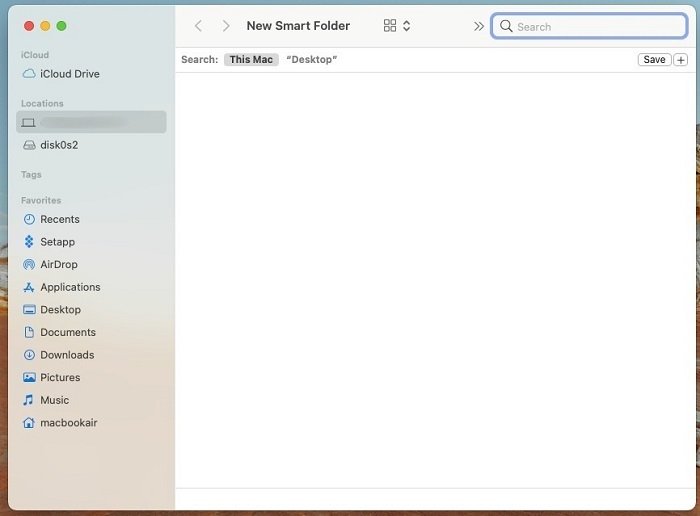
Step 1. Open Finder, and then click File > New Smart Folder.

Step 2. Hit the “+” at the top right corner to create a new Smart Folder.
Step 3. Set up filters to categorize the possible duplicate files.
At the drop-down menu below “Search”, you can enter different conditions to sort out your files.
For example, if you want to access all the PDF files on your Mac, you can select “Kind” for the first condition and “PDF” for the second one. Here’s the result:
Or you want to get all the files that contain the same keyword, for example, “holidays”. This time you can select “Name”, choose “contains” and finally enter “holidays” to get the results.
Step 4. Arrange the files by Name and then delete the duplicate ones.
As you have got the search results, you can now hit “Save” at the right top corner to save the Smart Folder and begin to tidy up the files.
Because the duplicate files are usually named the same as the original ones, you can right-click to arrange the files by their names to find and remove the duplicates.

Find and Remove Duplicate Files on Mac with Terminal
Another way to manually find and get rid of duplicate files on Mac is to use Terminal. By using the Terminal command, you can detect duplicate files more quickly than searching one by one by yourself. However, this method is NOT for those who have barely used Terminal before, for it might mess up your Mac OS X/macOS if you enter the wrong command.
Now, follow the steps below to know how to find duplicate files on Mac:
Step 1. Open Finder and type terminal to bring out the Terminal tool.
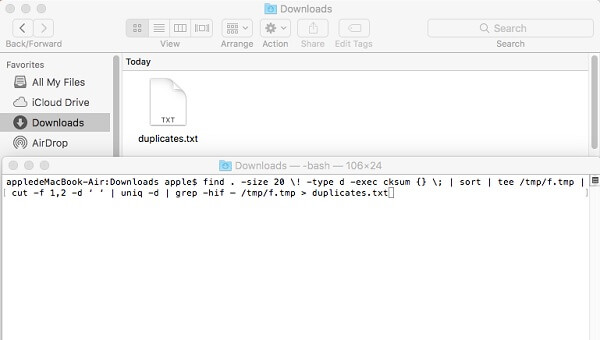
Step 2. Choose a folder that you would like to clean duplicates and locate the folder with the cd command in Terminal.
For example, to search duplicate files in the Downloads folder, you can type: cd ~/Downloads and click Enter.
Step 3. Copy the following command in Terminal and hit Enter.
find . -size 20 ! -type d -exec cksum {} ; | sort | tee /tmp/f.tmp | cut -f 1,2 -d ‘ ‘ | uniq -d | grep -hif – /tmp/f.tmp > duplicates.txt
Step 4. A txt. file named duplicate will be created in the folder that you have chosen, which lists out duplicate files in the folder. You can find and delete the duplicates manually according to the txt. file.
Noted that there are also some downsides:
- Searching duplicate files with Terminal in Mac is not totally accurate. Some duplicate files cannot be found by the Terminal command.
- With the search result provided by Terminal, you still need to manually locate the duplicate files and delete them one by one. It is still not clever enough.
Conclusion
Above we have provided three ways to find and remove duplicate files on Mac. Let’s review them once:
Method 1 is to use Mac Duplicate File Finder, a third-party tool to automatically locate and clean up duplicate files. The advantage of it is that it can cover all kinds of duplicates, is easy to use, and is time-saving.
Method 2 is to create Smart Folders on your Mac. It’s official and can be a great way to manage the files on your Mac. But it requires more time, and you may leave out some duplicate files because you have to sort them out by yourself.
Method 3 is to use Terminal Demand on Mac. It’s also official and free but is hard to use for many people. Also, you need to manually identify the duplicate files and delete them.
Considering the usage, Mac Duplicate File Finder is the best recommendation, but each one is a viable way and you can choose according to your need. If you have any concerns, feel free to reach us!