Always, there are people who are keen on moving pictures from iPhone to Android. Why is it so? Indeed, there are many reasons:
- People who own both an iPhone and an Android phone have stored thousands of images inside their iPhones, which leads to insufficient storage space in system.
- Switch phone from iPhone to newly-launched Android phone such as Samsung Galaxy S22, Samsung Note 22, Huawei Mate 50 Pro, etc.
- The need of sharing multiple photos on iPhone among friends.
iPhone users tend to take photos when they want to record memorable moments in life, they get used to download all kinds of images from the Internet, and they sometimes screenshot to save chat with family or friends. As a result, there will be many images stored up on their iPhones. So what can you do when you comply with one of the situations said above but do not know any method of transferring photos from iPhone to Android? Stop worrying too much and keep reading, I will offer you 4 workable solutions.
Method 1 – Transfer Photos from iPhone to Android via Mobile Transfer
This well-known powerful tool – MobePas Mobile Transfer enables you to transfer images from iPhone to Android phones such as Samsung Galaxy S22/S21/S20, HTC, LG, Huawei with just one click, and the photo formats that are able to be transferred include JPG, PNG, etc. The highlight of it is its simple and save-time operational approach. One USB cable for iPhone and one USB cable for Android are all you need to prepare. Let’s feel its powerful function by continuing reading.
Step 1: Download, Install and Launch MobePas Mobile Transfer, Click “Phone to Phone”.

Step 2: Connect Both your iPhone and Android to the PC
Here the leftward source presents your iPhone, and the rightward source presents your Android phone, don’t hesitate to click “Flip” if the sequence reverses. Don’t tick the option “Clear data before copy” for the security of the data on your Android.
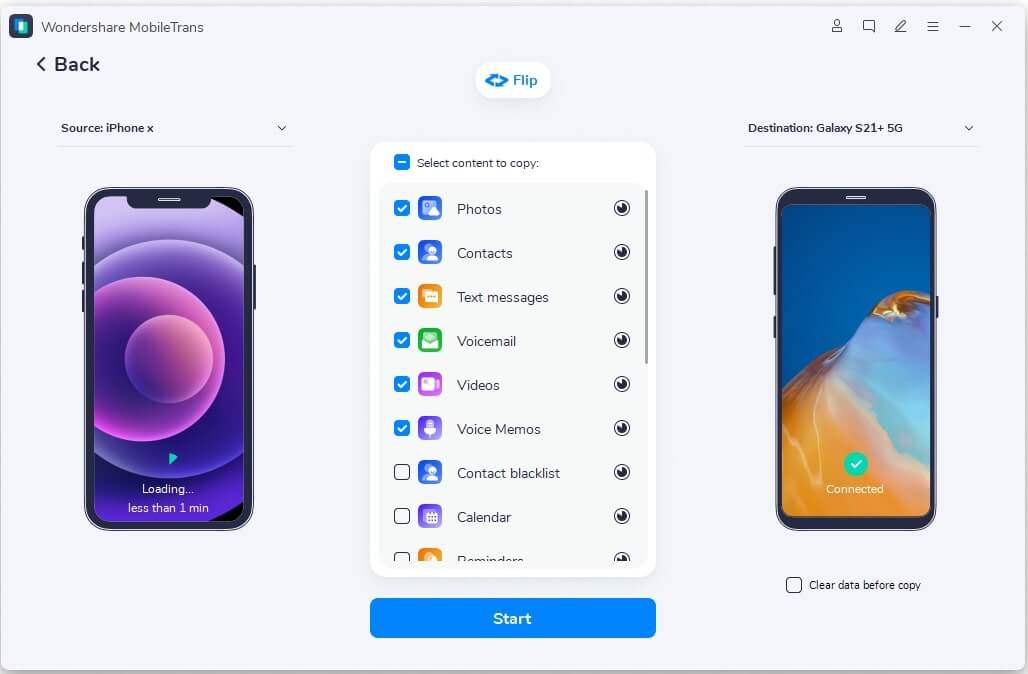
Note: Make certain that your iPhone is unlocked if you set a security code, or you can’t do one step further.
Step 3: Transfer photos
Select the “Photos”, and click the blue button “Start”. Supposing that thousands of photos on your iPhone need transferring, you may have to spend more than ten minutes.

Method 2 – Transfer Photos from iPhone to Android Through Google Photo
This method is making use of Google Photo. It’s less convenient than the above one but you can finish the transfer process without the assistance of a computer, which means you can finish the transfer process with your phone. Next, I will show you step by step.
Step 1: Install Google Photos on your iPhone, open Google Photos and click “GET STARTED”, tap “OK” in a small pop-up window to give permission to access photos on your phone. After that, turn off the option “Use cellular data to back up” in case you use data in excess, and tap “CONTINUE”.

Note: I suggest that you connect your phone to WI-FI.
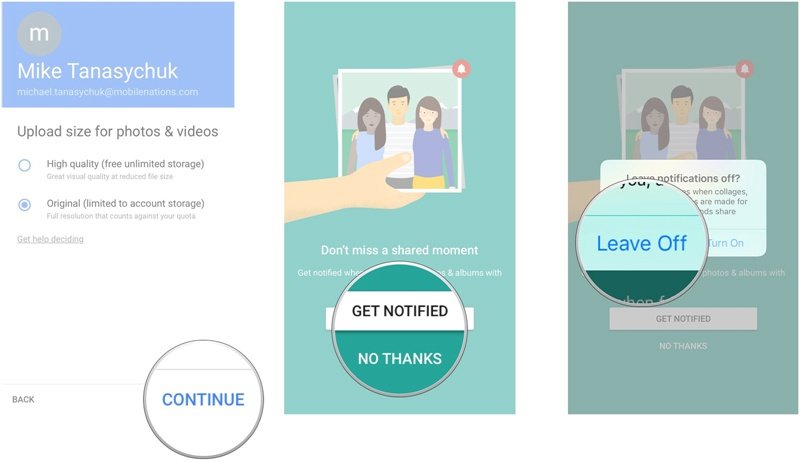
Step 2: To upload your photos, you need to choose the size of photos, including High quality and Original. You can tap the circle before the option according to your requirements, and click the button “CONTINUE”.
Note: High quality means that your photos will be compressed to 16 megapixels, which is for reducing the file size; Original means that your photos will remain to be the original size. Choosing the former enables you to get “unlimited storage” while tapping the latter one will count toward your Google Drive storage, which only contains 15GB of free capacity. On the last note, rest assured of choosing “High quality” because you can print good quality 16MP photos in sizes up to 24 inches x 16 inches.
Step 3: When you are asked if you need notifications when someone shares photos with you, you can choose either “GET NOTIFIED” or “NO THANKS” based on your individual willingness. And if you choose “NO THANKS”, click “Leave Off”. Then your photos will automatically sync to this app, and when you can have them on your new Android phone.
Note: Keep patient and don’t be rush to see your previous photos on your new Android phone, because the transfer process takes time. If there are a lot of images on your iPhone, the transfer process may take a long while.
Method 3 – Transfer Photos from iPhone to Android via Dropbox
The app – Dropbox, will be familiar to you? If you are accustomed to using Dropbox to back up your files and photos, go ahead as before, but I have to inform you about the capacity of its free space, which is only 2GB. There is a little difference between the Android version and the iOS version of this app, which will cause some restrictions on using this method.
Step 1: Go to App Store on your iPhone, download and install Dropbox.
Step 2: Open Dropbox and log into your account. If you don’t have one yet, don’ hesitate to create one now.
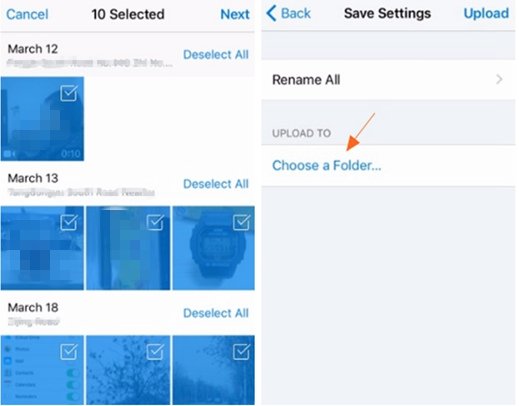
Step 3: Tap on”Choose photos”, and click “OK” when you are prompted to give Dropbox permission to access your photos. On the next screen, select photos that need transferring by clicking them one by one or “Select All”, and then tap “Next” at the top right corner.
Step 4: Tap “Choose a Folder” and you can choose either “Create Folder” or “Set Location”, then click the top-right button “Upload”.
Note: The upload process may take a long time, especially you select a lot of photos.
Step 5: On your Android phone, log in to the same account and download the photos you need.
Method 4 – Drag and Drop directly from iPhone to Android via USB
The last method introduced here requires a bit of manual effort although it is easy. What you need is an area Windows PC and two USB cables for both your iPhone and Android. Furthermore, make sure you’ve installed the device drivers of both phones so that they will be detected when plugged into your PC.
Step 1: Connect both your phones to the PC via USB cable, and then there will be two pop-up windows, which respectively represent the internal storage files of your two phones.
Note: If there are no pop-up windows, click My Computer on the desktop, and you will discover two devices under the items of Portable Devices. You can refer to the PrintScreen below.
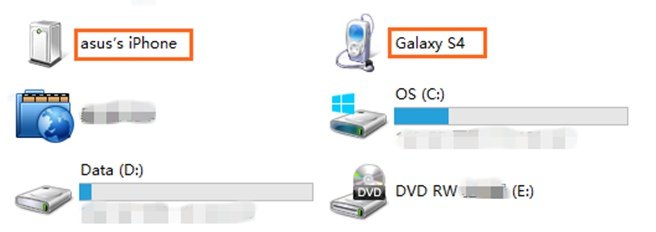
Step 2: Open your iPhone’s as well as your Android’s storage in new windows. In the window of the iPhone’s storage, find the folder named DCIM, which includes all your images. Choose the photos that you hope to transmit and drag them from iPhone’s images folder and drop them on Android’s photos folder.
Conclusion
I hope one of these methods will be of great help to you. Although there are solutions to move photos from iPhone to Android, I insist that you should back up your photos during normal times so as not to worry about data loss, especially the loss of your precious photos when you change a new mobile phone or get your old phone broken. Supposing that you use cloud backup, I advise you to take a trial for Google Photo which offers 15GB of free space. While if you use a local backup, you are recommended to make use of MobePas Mobile Transfer, which is equipped with the powerful functions of backup and restore between iPhone and Android. If you have any doubt, please leave them in the comment section.