
As the king of streaming music, Spotify attracts more and more people from around the world to enjoy perfect music playback. With a catalog of over 30 million songs, you can find various music resources on Spotify with ease. Meanwhile, adding to that Spotify Connect services, you can stream the service to a growing number of audio products. However, there still exists a limitation that you cannot listen to it on any device you want.
Therefore, the best method is to record music from Spotify and save it to your computer to play Spotify on more devices like MP3 players. When recording music from Spotify, you’ll need to first decide on the app you use. In this guide, we have found two methods to make the process safer and easier, that is, to record Spotify with Audacity and download Spotify with Spotify Music Converter.
Part 1. How to Record Music from Spotify with Audacity for Free
Audacity is a free open-source and cross-platform audio software that allows you to record and edit audio on Windows, Mac, and Linux computers. You can use it to record any audio playing on your computer, including audio from various streaming music platforms like Spotify. All the recordings can be saved in the format of MP3, WAV, AIFF, AU, FLAC, and Ogg Vorbis. Here’s how to record Spotify with Audacity.
Step 1. Set up devices to capture computer playback
Before recording music tracks from Spotify, you need to set up Audacity on your computer first, being dependent on your computer operating system and audio interface. You should select a suitable audio interface input for recording Spotify music on your computer, and here we’d choose to record computer playback on Windows.
Step 2. Turn the software playthrough off
Software Playthrough must be turned off when recording computer playback. If the playthrough is on, Audacity will try to play what it is recording and then re-record it. To turn the software playthrough off, click Transport > Transport Options > Software Playthrough (on/off). Or you could turn it off by setting the recording section of Audacity Preferences.

Step 3. Monitor and set initial sound levels
For better recording, try to set sound levels by playing similar material from your Spotify and monitoring it in Audacity, so that the recording level will be neither too soft nor so loud as to risk clipping. To turn monitoring on and off in the Recording Meter Toolbar, left-click on the right-hand recording meter to turn Monitoring on then click again to turn it off.
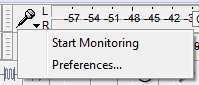
Except for that, you also need to adjust levels so that the sound of the recordings can be normal.
![]()
Both the output level of the audio you are recording and the level at which it’s being recorded will determine the achieved input level of the recording. To achieve a better recording level, you should adjust both the recording and playback level sliders on the Mixer Toolbar.
![]()
Step 4. Make the recording from Spotify

Click the Record button in the Transport Toolbar then start playing music from Spotify on the computer. Continue recording for as long as you want, but keep an eye on the “disk space remaining” message and on the Recording Meter. When the whole track finishes, click the Stop button to end the process of recording.
Step 5. Preserve and edit the capture
Then you could choose to save the recorded Spotify songs to your computer in your required format directly. Or you can customize the recorded Spotify songs once you find there are some problems in some clips of the recordings. Just click Effect > Clip Fix on Audacity to repair the clipping.
Part 2. Alternative Way to Record Spotify Music with Spotify Music Converter
Except for recording Spotify with Audacity, there is a better way: record Spotify music. In the case of Spotify users, better yet, to record music from Spotify is to use a professional downloading tool for Spotify like MobePas Music Converter. With the help of Spotify recorders, the recording of Spotify songs will be easier and faster.
MobePas Music Converter is a professional-grade and uber-popular music converter that long provides convenience for Spotify users. Capable of tackling the downloading and conversion of Spotify music, it can enable you to save your favorite tracks or playlists from Spotify to your computer regardless of which plan of Spotify you subscribe to.
Here we highlight several parameters on the MobePas Music Converter you can customize according to your demand.
- Six popular audio formats are available: MP3, FLAC, WAV, AAC, M4A, and M4B
- Six options of sample rate: from 8000 Hz to 48000 Hz
- Fourteen options of bit rate: from 8kbps to 320kbps
Step 1. Copy your chosen Spotify playlist’s URL
After installing MobePas Music Converter to your computer, launch it on your computer then it will instantly load the Spotify app. Navigate to Spotify songs that you want to rip. Then copy the URL of the track or playlist from Spotify and paste it to the search bar on Spotify Music Converter then click the “+” icon to add music. You can also drag and drop songs from Spotify to the interface of MobePas Music Converter.

Step 2. Set the output parameter for Spotify songs
Once you have added Spotify songs you want to download to MobePas Music Converter, all you have to do is set the output parameters. Click the menu bar and choose the Preferences option then Convert. Here you could adjust the output format, bit rate, sample rate, and channel. To achieve a stable conversion, you can check the Conversion Speed box and it would take more time for MobePas Music Converter to process the downloading.

Step 3. Start to download music from Spotify to MP3
After all the settings comply with your requirements, the app will start to download and convert music from Spotify to the default folder or your specific folder by clicking the Convert button. MobePas Music Converter finishes the downloading of Spotify tracks and you can go to browse the converted Spotify songs. To locate the converted Spotify music files, just click the Converted icon and the converted list will appear.

Part 3. What’s the Difference between Audacity and Spotify Music Converter
Although both Audacity and MobePas Music Converter can record music from Spotify, there also exists a huge difference between them. Audacity is an audio recorder for recording computer playback while MobePas Music Converter is a professional Spotify music downloading and converting tool. And more, see the complete list of differences between them.
| Operating system | Output format | Channel | Sample rate | Bit rate | Conversion speed | Output quality | Archive output tracks | |
| Audacity | Windows & Mac & Linux | MP3, WAV, AIFF, AU, FLAC, and Ogg Vorbis | × | × | × | 1× | Low quality | None |
| MobePas Music Converter | Windows & Mac | MP3, FLAC, WAV, AAC, M4A, and M4B | √ | from 8000 Hz to 48000 Hz | from 8kbps to 320kbps | 5× or 1× | 100% lossless quality | by artist, by artist/album, by none |
Conclusion
Audacity lets you record music from Spotify for free on your computer. However, if you’d rather download a dedicated app for your Spotify audio-ripping needs, MobePas Music Converter could be a good option for you. With this service, you can convert Spotify music from an encrypted format to several popular formats. It offers the ability to download any Spotify content to your computer, no matter whether you are a Spotify Free user or not.