The widespread use of cell phones, makes you get calls to communicate with family, friends, and colleagues more conveniently. If you have no habit to save some important call numbers as contacts, it is so sad that you realize the contact and call history is deleted or lost from your Android mobile by accident.
If you lost or delete some significant call logs, it will result in unexpected inconvenience. How to recover deleted call history from Android? All you need to do is to get a professional mobile data recovery software, which can help you get back your lost data back, and Android Data Recovery is such a tool.
Android Data Recovery is able to help you recover deleted data from Android, including call logs, contacts, pictures, SMS, video, audios, WhatsApp messages, and more, no matter you delete data by mistake, factory reset, system crash, forgotten password, flashing ROM, rooting, etc. It can be compatible with 6000+ Android devices, such as Samsung, HTC, LG, Huawei, Sony, Sharp, Windows phone, etc.
It allows you to preview the detailed information of call logs, selectively restore the call history you need, and then export the deleted ones as HTML or TEXT formate to your computer so that you can check it at any time.
In addition, it supports extracting data from broken android phone internal storage and SD card, fixing android phone system problems such as frozen, crashed, black-screen, virus-attack, screen-locked, and getting it back to normal.
Now download the android data recovery tool to try it by yourself.
Let’s check the steps below: how to recover lost call logs from Android. By the way, you can recover deleted contacts from Android in similar steps.
Steps of Recover Deleted Call History on Android Devices
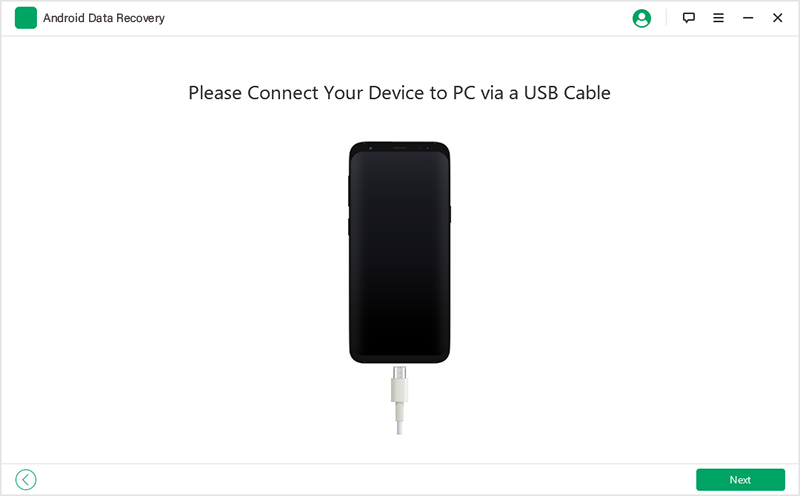
Step 1. Run the software and connect your Android phone to PC
Choose the right version, Mac or Windows, install and launch Android Data Recovery software after downloading it on your computer. Then connect your Android device to the computer via USB cable. To wait for the software to detect your device automatically.

Step 2. Set USB Debugging mode
Now, you should allow USB debugging by clicking “OK” on your device, then enabling USB debugging mode on an Android phone, follow the below steps.
If you are Android 4.2 or newer version: Tab “Settings” >”About phone”> “Build number” until the pop-up message of “You are under developer mode” appears. Return to “Settings” > “Developer options” >”USB debugging”.
If you are Android 3.0 to 4.1: Enter “Settings” < Click “Developer options” < Check “USB debugging”.
If you are Android 2.3 or earlier: “Settings” > “Applications” > “Development” > “USB debugging”.
Step 3. Choose call logs to recover
When the connection is completed, you will see the interface to choose the file type you want to recover. To recover call history, just tick “Call logs” and then click the “Next” button.

The analysis will take you a few seconds. After that, you’ll get a window as follows. You need to go back to your Android device’s screen to permit the Superuser Request by clicking the “Allow” button.

Step 4. Scan and recover Android call logs
After the automatic scan, all the scanning results will list in categories. Before recovering them, you can preview them in detail. Tap the data you want to get back and click “Recover” to transfer and save them on your computer.
Finish! Now download the software to have a try.