If you are a Samsung user, I guess you are likely to save some important data like SMS, contacts, and various types of files in your Samsung internal memory card. Beyond all questions, it’s a good place to store these data. However, have you ever wondered what should you do when you delete your important data on your Samsung internal memory card? If you find no way for help, I can recommend a powerful software called Android Data Recovery to solve your problem.
Android Data Iweghachite can serve you well with its strong function of retrieving Samsung data in your memory card without any quality loss. It enables you to regain whatever data you want.
Gbalịa ya n'efu Gbalịa ya n'efu
Tutorial to Restore the Files from Samsung Internal Memory
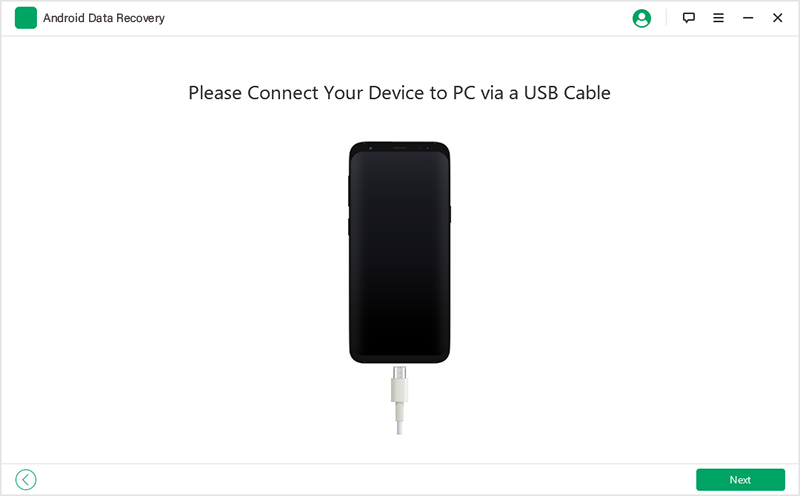
Step 1. Download and Run Android Data Recovery
Now you are provided with the trial version for free so you can try this fantastic software personally. The interface underneath will appear in front of you after you run the software and select the “ Android Data Iweghachite ” option.

Mara: Your phone battery should be guaranteed to be more than 20% during the process of scanning and recovery.
Step 2. Connection your Samsung to a computer
You are required to connect your Samsung with a computer by using a USB cable. You need to follow the steps underneath so as to conduct the process of USB debugging.
1)
If you are
Android 2.3 ma ọ bụ karịa
: Go to Settings” < Click “Applications” < Click “Development” < Check “USB debugging”
2)
If you are
Android 3.0 ruo 4.1
: Gaa na "Ntọala" < Pịa "Nhọrọ Mmepụta" < Lelee "USB debugging"
3)
If you are
Android 4.2 ma ọ bụ ọhụrụ
: Go to “Settings” < Click “About Phone” < Tap “Build number” for several times until you see the note “You are under developer mode” < Back to “Settings” < Click “Developer options” < Check “USB debugging”
Step 3. Begin the process of Samsung data scanning
After the program detects your phone, you can choose the files and you want to recovery. It’s available for you to click the button “ Họrọ Ha niile ” to scan all your Samsung data after executing the order of Samsung data scanning. After that, you need to select a storage scanning mode. Choose one of it and click “ Osote ” to go on.

In this step, you are asked to tick “ kwe ” on the home window when your phone shows you a note which aims to ask the access privilege.
Step 4. Retrieve Lost Data from Samsung Internal Memory
You can find your lost data on the right side after several minutes. The lost data can be divided from all data which is scanned out by tapping the middle top “ Na-egosipụta naanị ihe ehichapụrụ ” when you are in need of seeing your lost data only.
Now you can go back and tap on the button “ Gbakee ” after you choose your wanted data. In this way, all your SMS, contacts will be saved on the computer from your Samsung Internal Memory.

Wonderful! The whole process is achieved with such a simple operation. Losing data is no longer a nightmare for you, right? Hurry up, download Android Data Iweghachite and let it help you when you are confronted with mobile phone problems. You also can give us your comment when you meet some problems with the software. we will keep in touch with you as soon as possible.
Gbalịa ya n'efu Gbalịa ya n'efu